Basic Image Operations
- Python Pillow - Working with Images
- Python Pillow - Resizing an Image
- Python Pillow - Flip and Rotate Images
- Python Pillow - Cropping an Image
- Python Pillow - Adding Borders to Images
- Python Pillow - Identifying Image Files
- Python Pillow - Merging Images
- Python Pillow - Cutting and Pasting Images
- Python Pillow - Rolling an Image
- Python Pillow - Writing text on image
- Python Pillow - ImageDraw Module
- Python Pillow - Concatenating two Images
- Python Pillow - Creating Thumbnails
- Python Pillow - Creating a Watermark
- Python Pillow - Image Sequences
Python Pillow Color Conversions
- Python Pillow - Colors on an Image
- Python Pillow - Creating Images With Colors
- Python Pillow - Converting Color String to RGB Color Values
- Python Pillow - Converting Color String to Grayscale Values
- Python Pillow - Change the Color by Changing the Pixel Values
Image Manipulation
- Python Pillow - Reducing Noise
- Python Pillow - Changing Image Modes
- Python Pillow - Compositing Images
- Python Pillow - Working with Alpha Channels
- Python Pillow - Applying Perspective Transforms
Image Filtering
- Python Pillow - Adding Filters to an Image
- Python Pillow - Convolution Filters
- Python Pillow - Blur an Image
- Python Pillow - Edge Detection
- Python Pillow - Embossing Images
- Python Pillow - Enhancing Edges
- Python Pillow - Unsharp Mask Filter
Image Enhancement and Correction
- Python Pillow - Enhancing Contrast
- Python Pillow - Enhancing Sharpness
- Python Pillow - Enhancing Color
- Python Pillow - Correcting Color Balance
- Python Pillow - Removing Noise
Image Analysis
Advanced Topics
- Python Pillow - Creating Animated GIFs
- Python Pillow - Batch Processing Images
- Python Pillow - Converting Image File Formats
- Python Pillow - Adding Padding to an Image
- Python Pillow - Color Inversion
- Python Pillow - M L with Numpy
- Python Pillow with Tkinter BitmapImage and PhotoImage objects
Python Pillow Useful Resources
- Python Pillow - Quick Guide
- Python Pillow - Function Reference
- Python Pillow - Useful Resources
- Python Pillow - Discussion
Python Pillow - M L with Numpy
Image manipulation with NumPy is a common practice in image processing tasks. NumPy provides a powerful array manipulation library that complements Pillow's image processing capabilities. This tutorial demonstrates how to use Pillow with NumPy for efficient image processing.
Installation
Before proceeding, ensure we have NumPy installed. Open the command prompt in administrator mode and execute the following command −
pip install numpy
Note − This command works only if you have PIP installed and updated.
Creating image from Numpy Array
When working with NumPy arrays as images, we can use the Image.fromarray() function to create an image memory from an object that exports the array interface, typically using the buffer protocol. If the input array (obj) is contiguous in memory, Pillow can use the array interface directly. If the array is not contiguous, Pillow will use the tobytes method, and frombuffer() will be used to create the image. Here's the syntax of the fromarray() function −
PIL.Image.fromarray(obj, mode=None)
Where,
obj − The object exporting the array interface. This is usually a NumPy array, but it can be any object that exposes the required interface.
mode (optional) − The mode parameter specifies the color mode or pixel format of the resulting image. If not provided, the mode is inferred from the type of the input array.
It's important to note that Pillow modes (color modes) do not always correspond directly to NumPy data types (dtypes). Pillow modes include options for 1-bit pixels, 8-bit pixels, 32-bit signed integer pixels, and 32-bit floating-point pixels. The mode is either explicitly specified or inferred from the dtype of the input array.
Example - Creating Image using NumPy Array
In this example, a NumPy array is created, and then Image.fromarray() is used to create a Pillow Image from the NumPy array. The resulting image is a Pillow Image object that can be further processed or saved.
main.py
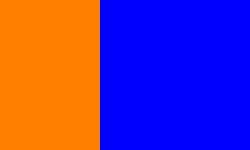
from PIL import Image
import numpy as np

# Create a NumPy array
arr = np.zeros([150, 250, 3], dtype=np.uint8)
arr[:,:100] = [255, 128, 0]
arr[:,100:] = [0, 0, 255]

# Create a Pillow Image from the NumPy array
image = Image.fromarray(arr)

# Display the created image
image.show()
Output
Example - Creating Image with Mode
Here is another example that create a Pillow Image from the NumPy array by explicitly specifying the mode.
main.py
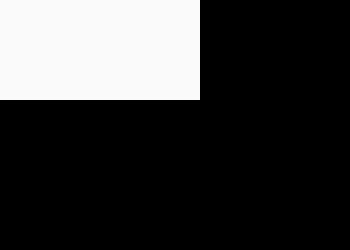
from PIL import Image
import numpy as np

# Create a NumPy array
arr = np.zeros([250, 350, 3], dtype=np.uint8)
arr[:100, :200] = 250

# Create a Pillow Image from the NumPy array by explicitly specifying the mode
image = Image.fromarray(arr, mode='RGB')

# Display the created image
image.show()
Output
Example - Creating a Grayscale
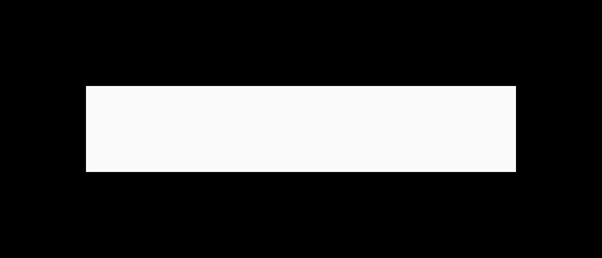
This example creates a grayscale image from a numpy 2-dimensional array by explicitly specifying the mode equal to "L".
main.py
from PIL import Image
import numpy as np

# Create a NumPy array
arr = np.zeros([300, 700], dtype=np.uint8)
arr[100:200, 100:600] = 250

# Create a Pillow grayscale Image from the NumPy array
# by explicitly specifying the mode
image = Image.fromarray(arr, mode='L')
print("Pixel values of image at (150, 150) of the grayscale image is:", image.getpixel((150, 150)))

# Display the created image
image.show()
Output
Pixel values of image at (150, 150) of the grayscale image is: 250
Example - Creating numpy array from a Pillow Image
The numpy.asarray() function can be used to convert a Pillow image to a NumPy array. However, it's important to note that when converting Pillow images to arrays, only the pixel values are transferred. This means that certain image modes, like P and PA, will lose their palette information during the conversion.
The following example demonstrates how to convert a Pillow image to a NumPy array.
main.py
from PIL import Image
import numpy as np

# Open an image as a pillow image object
image = Image.open("Images/tutorialspoint.jpg")

# Convert the Pillow image to a NumPy array
result = np.asarray(image)

# Display the type, shape and dtype of the NumPy array
print("Type:", type(result))
print("Shape:", result.shape)
print("Dtype:", result.dtype)
Output
Type: <class 'numpy.ndarray'>
Shape: (225, 225, 3)
Dtype: uint8